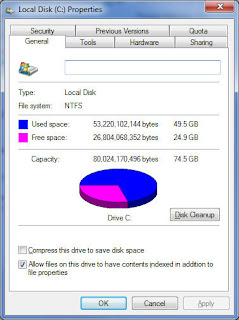
The purple segment of the pie tells you how much free space is left on the drive. This example has only 24 Gb left so you wouldn't be able to install W7 on here. In fact this is C: drive on my main computer and W7 is already installed as are my applications which still left me 24 Gb so proving that W7 isn't a space hog like Vista was as it doesn't load a lot of stuff you might not need.
Friday, 30 October 2009
Windows 7 Upgrade - Now for a laptop
The purple segment of the pie tells you how much free space is left on the drive. This example has only 24 Gb left so you wouldn't be able to install W7 on here. In fact this is C: drive on my main computer and W7 is already installed as are my applications which still left me 24 Gb so proving that W7 isn't a space hog like Vista was as it doesn't load a lot of stuff you might not need.
Sunday, 25 October 2009
Setting up a mixed network in Windows 7
After the first stage of the upgrade the two Vista Home and the Windows 7 RC1 computers will have been upgraded to Windows 7. Now comes the challenge of getting them all to talk to each other.
The main difference between XP, Vista and now Windows 7 is that Windows 7 has introduced something called a Home Group. This is a collection of Computers all running Windows 7 linked by a password. As you install Windows 7 on the first computer in the Home Group you will be given a password to link all the computers together. Write it down paying careful attention to the case of the characters as this password is case sensitive. As you load the other computers on your network with Windows 7 make sure that all of them have the same Home group Password and can see each other.
If you have been running a network for a while, you probably already have a workgroup name. However if you aren't clued up on network security it will probably be one of the two Microsoft default names, MSHOME or WORKGROUP. I would strongly suggest you give it a different name (any name will do) because the defaults are the first ones a hacker would try.
When you have chosen a name, you need to work your way through all the computers starting with the oldest operating system. So....
- In Windows 2000 and XP - right click on the My Computer icon on the desktop. Go to Properties and on the Computer Name tab make sure that the computer has an unique name and the Workgroup name is the one you have chosen.
- In Vista and Windows 7 - right click on Computer and go to Properties. Click on Advanced System Settings and go to the Computer Name tab. Click on the Change button and give the computer a unique name then type in the Workgroup name you have chosen.
- On the Network ID button and make sure you are using a 'Home' network.
You may find that if you use autologon instead of having to enter your user name and password every time you boot your computer, the settings may have been reset to default. If so go to Start ...
- for Vista and Windows 7 press the Windows key + R and in Run type control userpasswords2 exactly as it here and press enter.
- Uncheck the option 'Users must enter a user name and password to use this computer'.
- Click OK
- You will be prompted to enter the current password and confirm it.
In XP if there is only one user account on the computer Windows will not ask you to logon but occasionally XP gets itself reset and starts to ask you to logon. To reset Autologon you.........
- Click Start, and then click Run.
- In the Open box, type control userpasswords2, and then click OK.
- Clear the "Users must enter a user name and password to use this computer" check box, and then click Apply.
- In the Automatically Log On window, type the password in the Password box, and then retype the password in the Confirm Password box.
- Click OK to close the Automatically Log On window, and then click OK to close the User Accounts window.
Once all the computers in your network have been renamed, have a unique ID and the same workgroup name shut them all down including your router and any switches/hubs you may be using.
- To restart the whole network start the router followed by any switches/hubs.
- Next boot up a computer containing Windows 7
- Boot any other computers containing Windows 7
- Click on the Network icon on the desktop and make sure all your Windows 7 computers can see and talk to each other.
- Now boot up any Vista computers and make sure they have joined the network.
- Finally boot up and Windows XP/2000 computers and see that they appear.
NB: It is possible to connect computers using other operating systems (Linux, Mac, Windows 9X/Me) to a network like this but the tweaks you have to do are beyond the scope of this article. You can fine help and information on my Network page at
http://www.omega-cottage.co.uk/.
You can download this blog as a PDF from here
Saturday, 24 October 2009
Windows 7 Day 3 - Load the software
When "I've got a new computer" was first written, spam, viruses and other assorted nasties were not the problem they are now so it was relatively safe to start loading programs before adding security to your computer. Now it is a very different story. One of our major universities decided to see what would happen if an unprotected computer was left connected to the internet. It was setup in a room with just an internet connection but not a network one so it paralleled a home setup. The computer had no Antivirus, spyware or firewall loaded so was completely unprotected. The computer logged on to the internet and the computer was then left to its own devices. Within 15 minutes it was infected and in less than half an hour it had been linked to a Trojan network. This is why you need to protect yourself at all times. So job one today is to install an Antivirus program, a adware and spyware program and make sure your firewall is up and running.
I use the free Antivirus program Avast Home and it has never let me down. You can download it at
http://www.avast.com/eng/download-avast-home.html.
Let it install and run a boot time virus check.
Next download and install an adware program. The two most popular are Adaware which you can download from
http://www.lavasoft.com/products/ad_aware_free.php
and Spybot which you will find at
http://www.safer-networking.org/en/download/index.html
If your connection to the Internet is via a router you will probably find that it has a hardware firewall built in but check your manual to make sure it has and that it is switched on. If you don't use a router then you need to think about downloading and installing a software firewall. Windows 7 has one built in but many of the writers in this field don't trust it. I am not one of them because I have a hardware firewall so don't have to rely on the Windows one but the one most favoured by the technical press is Zonealarm. You can download and install the free version from
http://www.zonealarm.com/security/en-us/zonealarm-pc-security-free-firewall.htm
Now taking the list you made of the programs you want on your computer that you made on Day 1, start to load your computer.
- Remember to reboot your computer when each program has finished loading.
- When the computer has rebooted, check that the program you have loaded runs properly by opening it and complete any registrations you may need to complete before moving on to the next program on your list
- Don't get impatient and try to load more than one program at a time. Doing that is a sure way for things to go wrong.
- Once all the programs are installed, run defrag to tidy up the HDD and then do a scan of the HDD to make sure there are no orphan files or files that have become fragmented. To do that a. Go to All Programs > Accessories > Command Prompt, Right click and go to Run As Administrator
b. In the DOS window that opens at the prompt (C:\Users\%Your Account%>) type dskchk C: press enter and you will get a result that looks something like this
c. Look down the list and see if any error messages are showing. If they are, run chkdisk again but this time type this chkdsk C: /f which will ask Windows to try to fix any errors.
That's it, you now have a computer that is ready for use. I have no doubt that as time goes by we will become aware of bugs in this new version of Windows.
You can download this blog as a PDF here
Thursday, 22 October 2009
Windows 7 - Day 2 - Load the Operating System
Before C: is wiped make sure you know which version of Windows (32 or 64 bit) you are running. You can find that out by right clicking on the (My) Computer Icon on the desktop and going to properties.
I chose to wipe and do a clean install so let's begin there.
There are two ways to wipe C: drive;
- Use a third party partition manager like Partition Magic and do a full format of the drive which should get rid of all traces of your previous windows installation and any nasties lurking amongst the files.
- You can use the drive format utility in the Windows install but be aware that this is a quick format that only wipes the file allocation table (FAT) not the files themselves.
I used the Partition Magic Rescue Disk Set as I wanted to make sure I was working with a clean HDD.
The next stage is to put the Windows DVD in the drive making sure you are using the right one as all the retail versions of Windows 7 come with both 32 and 64 bit versions. Restart the computer and if the BIOS are properly set you should see Windows files starting to load.
Now comes the setup for the install;
- The first screen sets your location, language and keyboard. Select UK English and windows will assume you are in the UK and using a UK keyboard.
- In the next window click on Install Now
- Accept the licence for the software after reading it
- Next select Custom install not upgrade
- In the next window select drive 0. This is/was C: drive before you formatted it
a. If you chose not to format the drive before beginning this process, now is the time to do it by clicking on Drive 0 and on format below the drive window. it only takes a few seconds and then you can click on next.
b. One word of warning here. If you are upgrading from XP your C: drive may be quite small as XP has a very small footprint compared to Vista. Windows 7 needs 26 Gb of free space just for the operating system. You also need room to install programs like Office. I would suggest that the smallest drive you can safely install Windows 7 on is 80 Gb.
c. If you are installing on to a laptop make sure you don't inadvertently delete or format the space on the HDD where your recovery files are located. You should have copied them to a recovery CD/DVD before beginning any work on your laptops HDDs. - The next window is where the files for the new operating system are copied to the HDD, unpacked and installed. Nothing much will happen while this is going on so go and make yourself a sandwich and a pot of coffee.
- Your computer will restart several times while the installation is in progress and you will be asked for a name for your account, a name for the computer and a password. Write these down because if you forget them you will have to go back to square one and start again.
If the previous 7 steps have completed successfully you now have a brand new clean installation of Windows 7.
The next job must be to install an Antivirus program before you do anything else to your computer. Miss out this step at your peril, it takes only a very few minutes for an unprotected computer connected to the internet to be infected.
You can now begin to set your computer up for internet, email, add accounts for other users on family machines and generally get the computer ready to have the programs installed. You will find my guide for doing this at
I have got a new computer.You can download this blog as a PDF here
Wednesday, 21 October 2009
Update to Windows 7 - Day 1 - Preparation
So how do you plan your upgrade? This is how I do it :-
- Go to Start > All Programs and make a list of all the programs/applications at present on your computer
- When you have made the list go through it and cross off any program you haven't used in the past six months - odds are you don't need it and won't miss it.
- Decide where you are going to back up your present computer to. This can be..
a. A separate HDD in your present computer (Not a partition on the same HDD)
b. A large memory stick (At least 4 Gb preferably larger)
c. An External HDD
d. Several CDs or DVDs (not the best solution as too much can go wrong in the file copying process)
e. Do not try to do this with Floppy disks (you would need hundreds) or Zip drives which are not supported in Windows 7 - In Windows find your Desktop folder and copy it to your backup folder(s)
a. In XP you will find it at C:\Documents and Settings\%your Account%\Desktop
b. In Vista the folder is in C:\users\%your account%\Desktop - Next find the Favourites folder and copy that to the backup You will find the Favourites folder in the same place you found desktop
- Find the links folder and copy that to the backupYou will find the Links folder in the same place you found desktopNB - you may not find one in XP it depends on the version of Internet Explorer you are using.
- Now find the Documents folder (My Documents in XP) and copy it to the backup
- You may have a Downloads folder - if you do copy that to the backup
- If you save or edit videos find the Videos folder and copy it to the backup
- Likewise if you have any saved pictures on your HDD find the folder that contains them and copy it to the backup
- If you have downloaded any music you will find the files in the music folder - copy it to the backup
- In Vista you may find a Contacts folder in %your Account% folder - copy that to the backup
- If you use Outlook you now need to start to back it up. First find the Outlook folder that contains the pst files.
a. In Vista they are in C:\Users\%your Account%\AppData\Local\Microsoft\Outlook
b. In XP they are found in C:\Documents and Settings\%your account%\Local Settings\Application Data\Microsoft\Outlook - Copy all the files in the folder to a new folder called Outlook in your backup folder
- Make sure you have written copies of the settings for ALL your email accounts. You need for each one the following :-
a. The email address
b. The username
c. The password
d. The pop3 server address
e. The smtp server address - Now back up any message rules you use
a. Go to Tools > Rules and Alerts (Outlook 2007) > Options > Export Rules and save them to a rules folder you have made in the outlook folder in your backup - There are several commercial solutions to backup Outlook email accounts but there is not one recommended by Microsoft. The only other way to do it is by copying part of the registry and then copying that into your 'new' computer registry. If you don't know what you are doing this method is fraught with problems so I am not going to detail it.
- Last but by no means least, search your C: drive for any data that you may have saved there and copy it to your backup. These can be anything from photos, MS Word files, Spreadsheets, in fact anything you have made/produced yourself. Check carefully because once you have formatted your drive ready to install Windows 7, anything you have missed is gone forever.
Right you are now ready to start the process of installing Windows 7. My copy of Windows 7 Professional has just arrived so I had better start doing what I have told you to do.
You can download this blog as a pdf here
Friday, 16 October 2009
Windows 7
To try to answer some of these questions I have written a web page all about Windows 7 that I hope will answer most if not all of these questions. To do it I have trawled the web to find relevant articles, forums and blogs that all throw light on what Windows 7 is and, more importantly, what it is not. The forums give you a cross section of the questions people are asking about Windows 7 and some of the answers. The blogs are by the team who built Windows 7 and some of the people involved in its testing.
You can find the Windows 7 page here omega-cottage.com
Octreotide
I am now one week into the trial of Octreotide and to date I have no symptoms of dumping[1]. I do have a new side effect though. The amount of food I can eat at one sitting is now much smaller than it was before the injections began. This is a return to how my stomach was immediately after the op. This may be a good thing as I have grown a bay window. If I can only eat very small portions I may just lose weight and some inches off my waist line.
I also have a new blood meter. My old one was showing signs of age so I rang up to buy a new one. I was told I didn't need to buy a new one, I could have one free plus I could have the download cable to connect it to my computer and the software to record and analyse my daily blood results. Well I have never been one to say no to a free gadget so I now have an internet connected blood meter - whatever will the boffins come up with next?
[1] Dumping is when, after eating, your pulse races, you sweat profusely, you feel faint or dizzy, your blood sugar rises and you are sometimes sick.
Saturday, 10 October 2009
Octreotide and a new lease of life
SUCCESS !!!!
For the first time in several years I was able to eat a full meal with no symptoms at all. We repeated the test at the next three meals each time giving me an injection an hour before eating. Each time I ate the meals with no distressing symptoms at all.
So I am now home again with a bucket full of syringes a fridge full of Octreotide and very sore fingers from all the BM tests. The plan is that over the next few weeks I will continue the injections at home and see if the improvement is sustained. If it is I will be reviewed in clinic and a long tern regime for these injections will be worked out.
Octreotide has two unfortunate side effects. the first is that it gives you very smelly wind. Even the cats were complaining last night. I am told this eases off in time as your body gets used to the drug. The second side effect is more serious as octreotide interferes with the action of diabetic medication like Metformin. My blood sugars have gone from their usual 7 to 8 (too high I know) to between 10 to 17. Short term I have been told to double the Metformin and check my bloods three times a day (Oh my sore fingers) Long term I have been referred to the diabtologists at LGI to see if I need additional medication or even need to move on to insulin injections.
Well that's it, I am home and maybe, just maybe, I can get back to being able to eat in public again and share a meal with friends and family. If that is so, it means I will get back some of what I had lost through dumping all this time. my only regret is that it has taken so long for the medics to try to help me.
Wednesday, 7 October 2009
Dumping - maybe but maybe not
I am still in hospital and I am writing this blog from my hospital bed on my laptop.
When the Drs suggested I came into hospital I was quietly pleased that someone was going to have a look at the unpleasant symptoms I get whenever I eat.
In short what happens after the first few mouthful is :-
- I start to sweat heavily
- My pulse rate jumps to about 150 bpm
- My blood pressure rises
- I feel dizzy
- I am sometimes sick
In the past these symptoms have been described as Dumping Syndrome and various Doctors and Surgeons have told me they could do nothing about it. Three weeks ago I was referred to a Gastroenterologist at Jimmy’s here in Leeds. In the past most medics have pooh poohed my description of the symptoms I get when I eat so I thought it wouldn’t hurt anything to show them.
The appointment was a 9am so instead of having my breakfast at home I took it with me and ate it just before going in to see the Dr. She took one look at the state I was in and decided I needed to come into hospital for tests to try to work out what was going on.
I think I will draw a veil over the false starts and none availability of beds but eventually I found myself on the gastroenterology ward discussing what happens to me when I eat.
The first test I was given is called a Glucose challenge test which is the standard test for diagnosing diabetes. It involves fasting for 16hrs then drinking a sugary drink. To see what happens a blood sample is taken every 30 minutes for three hrs and your BP, pulse, rate and oxygen levels are also checked.
I didn’t react as they thought I would because I don’t react to sugar in any form other than to start passing sugar in my urine. However it did confirm I am diabetic (This has never been tested for before).
After a lot of head scratching and tooth sucking the Drs decided to devise a test to see what happens when I eat toast. The test has been dubbed the toast challenge test and involves another 16hr fast and then being given 3 slices of buttered toast and a cup of coffee. This time I did react, I was wet through with sweat (I needed to change my pyjamas), My BP went through the roof, my heart rate was just short of 200bpm and I felt really ill. The bloods they took during this test charted the rise in my blood sugar to 17.1 (normal is less than 7) and confirmed that I am a full diabetic but didn’t explain why I react the way I do when I eat.
When the results of the bloods came back from the lab they gave a picture of a rising blood sugar for the first 30 mins after eating and then over the next two hours a slow drop back towards normal. This is NOT dumping syndrome as what would have happened if it was is that my blood sugar should have gone up over a 2 hr period and then suddenly drop to 3 or less accompanied by tremors on the limbs.
As I have reacted to every meal I have been given in hospital so far the Medical team are very aware there is something wrong but are stumped to explain just what. The next step in the investigation is to repeat the toast challenge but this time to give me an injection of Octreotide during the test.
I am apprehensive about this test because looking this drug up on the internet, it is widely used to ease the symptoms of Dumping by increasing the output of insulin and other gastric enzymes. However as my symptoms are the opposite of those shown by classical dumping it isn’t clear what effect Octreotide will have on me. Oh well if anything goes wrong Jackie will be here with me to alert the staff and I couldn’t be in a better place.
Watch this space to see if the test showed up anything interesting.